2022.12.25
AlmaLinux9環境にNginxをインストールし、サブドメインをワイルドカードで指定してLet's EncryptでSSL対応する
AlmaLinux9にNginxをインストール
CentOSのサポート期間の問題でAlmaLinuxを使ってみることにしました。
パッケージマネージャはdnfで、以下がNginxのインストール方法です。
まずはNginxインストールの準備をしていきます。
bash_____none_____$ sudo dnf upgrade --refresh -y
$ sudo dnf install dnf-utils -y

# vimでnginx.repoを作成する(もしくはすでに存在すれば下記のように追記)
$ sudo vim /etc/yum.repos.d/nginx.repo
text_____/etc/yum.repos.d/nginx.repo_____[nginx-stable]
name=nginx stable repo
baseurl=http://nginx.org/packages/centos/$releasever/$basearch/
gpgcheck=1
enabled=1
gpgkey=https://nginx.org/keys/nginx_signing.key
module_hotfixes=true
[nginx-mainline]
name=nginx mainline repo
baseurl=http://nginx.org/packages/mainline/centos/$releasever/$basearch/
gpgcheck=1
enabled=0
gpgkey=https://nginx.org/keys/nginx_signing.key
module_hotfixes=true
続いてNginxをインストールします。
bash_____none_____$ sudo yum-config-manager --enable nginx-mainline
$ sudo dnf install nginx -y
$ nginx -v
nginx version: nginx/1.23.3

$ sudo systemctl start nginx
$ sudo systemctl enable nginx
併せてfirewallでhttpとhttpsが許可されているか確認します。
bash_____none_____$ sudo firewall-cmd --permanent --list-all
cockpit dhcpv6-client http https ssh

# もしhttpとhttpsが許可されていなかったら許可リストに追加してリロード
$ sudo firewall-cmd --permanent --add-service=http
$ sudo firewall-cmd --permanent --add-service=https
$ sudo firewall-cmd --reload
Let's EncryptのSSL証明書インストール
次に、未定の複数サブドメインに対しても有効なSSL証明書を発行できるよう、サブドメインをワイルドカードで指定してインストールします。
bash_____none_____# certbotのインストール
$ sudo dnf install epel-release
$ sudo dnf install certbot python3-certbot-nginx

# 証明書インストール
# example.com の部分は適宜変更
$ certbot certonly --manual --preferred-challenges dns-01 -d example.com -d *.example.com
証明書インストールコマンドの補足
サブドメインに対してワイルドカードを指定する場合は、ドメインのTXTレコードに、指定された値をセットすることでDNSによる証明が必要となります。
そのときに使用するのが上記コマンドの次の部分です。--preferred-challenges dns-01
すると以下のように表示されます。
bash_____none_____Please deploy a DNS TXT record under the name:

_acme-challenge.example.com.

with the following value:

xxxxxxxxxxxxxxxxxxxxxxxxxxxxxxxxxxxxxxxxxxx

Before continuing, verify the TXT record has been deployed. Depending on the DNS provider, this may take some time, from a few seconds to multiple minutes. You can check if it has finished deploying with aid of online tools, such as the Google Admin Toolbox: https://toolbox.googleapps.com/apps/dig/#TXT/_acme-challenge.example.com. Look for one or more bolded line(s) below the line ';ANSWER'. It should show the value(s) you've just added.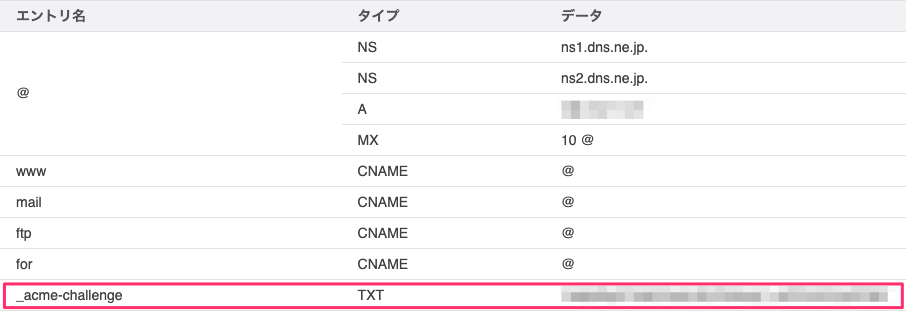
Nginxのconfに追記
SSL証明書のインストールが完了したら、confファイルの443ポートをlistenしているserverブロックに以下のように追記します。
text_____none_____server {
    listen 443 ssl;

    # ...(省略)

    # 追記箇所
    ssl_certificate     /etc/letsencrypt/live/sample.com/fullchain.pem;
    ssl_certificate_key /etc/letsencrypt/live/sample.com/privkey.pem;
}
httpsでアクセスしてみて問題なく表示できたら設定完了です。